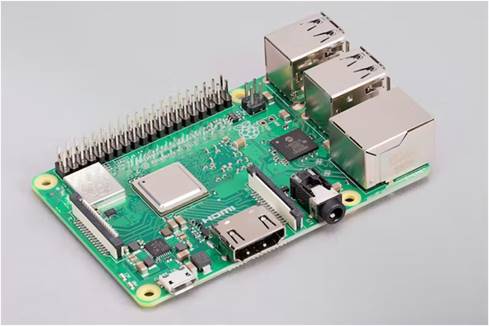
Using a Raspberry Pi
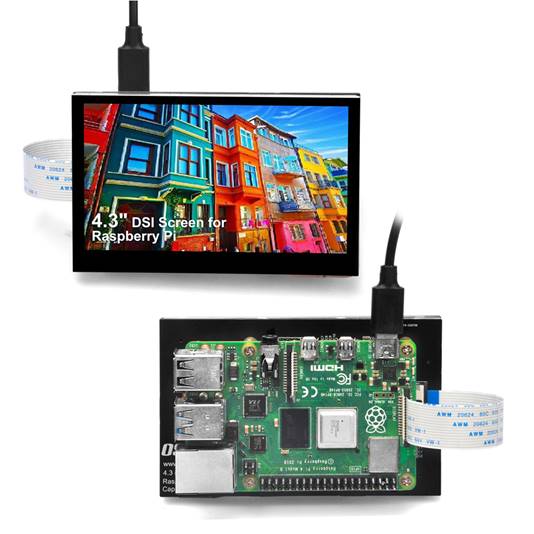
A combination of Raspberry Pi with Raspberry Pi OS installed in GUI environment and touch monitor is required.
To install TOMATE, you need an environment that allows SSH connection via LAN.
 raspberrypi.com
 osoyoo.com
![]() We
recommend using Raspberry Pi 2 or higher.
We
recommend using Raspberry Pi 2 or higher.
The Raspberry Pi touch monitor recommends DSI connection.
For DSI-connected touch monitors, the backlight brightness can be adjusted from the OS standard device driver, so TOMATE
uses this device driver to adjust the brightness.
If you do not use these functions, you can use a touch monitor with an HDMI
connection.
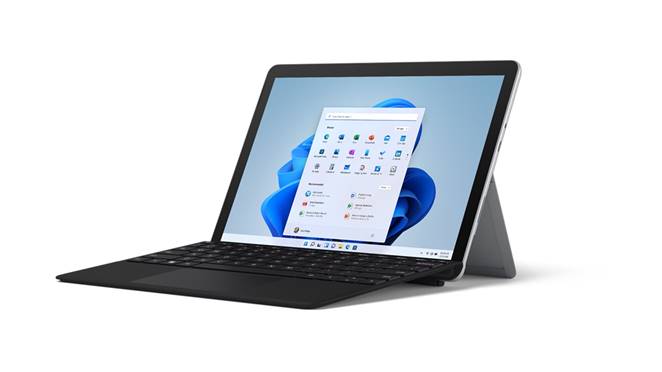
Using a Windows PC
It also works on a Windows PC with a touch panel or with normal PC + mouse operation.
 microsoft.com
![]() In
the Windows environment, screen startup adjustment and sleep functions cannot be used.
In
the Windows environment, screen startup adjustment and sleep functions cannot be used.
On the Raspberry Pi, install the Raspberry Pi OS with a standard GUI environment.
Download, install, and run the Raspberry Pi Imager app from https://www.raspberrypi.com/software/.
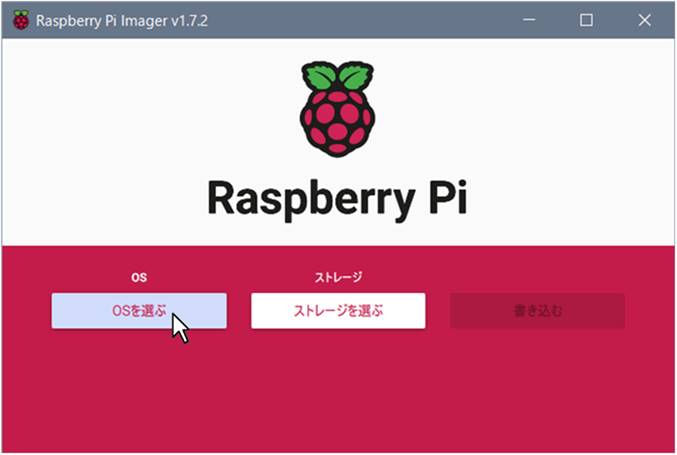
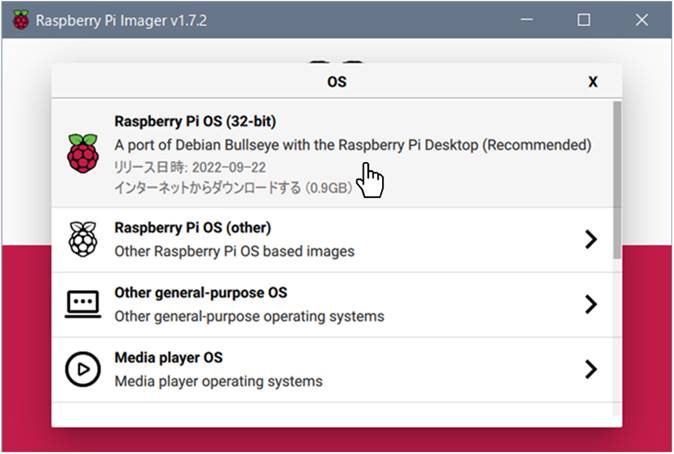
Press the "Select OS" button and select the recommended Raspberry Pi OS (32-bit).
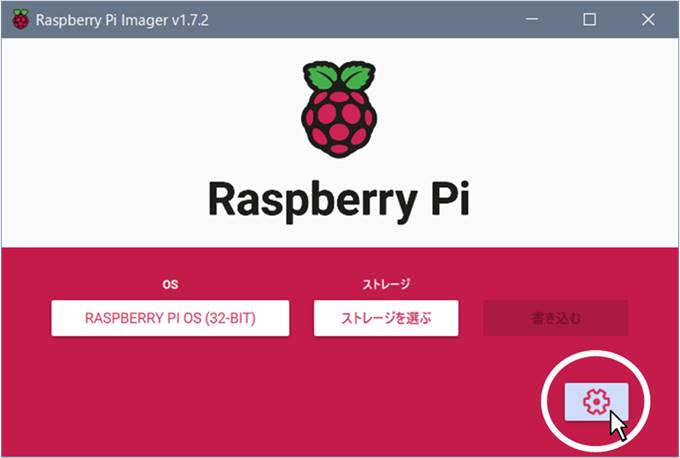
After selecting the OS, you will see the "Settings icon" at the bottom right.
From
the settings, check "Enable SSH" and set the "Username" and
"Password".
Make a note of your username and password.
The information entered here is required when
uploading from TOMATE to Raspberry Pi.
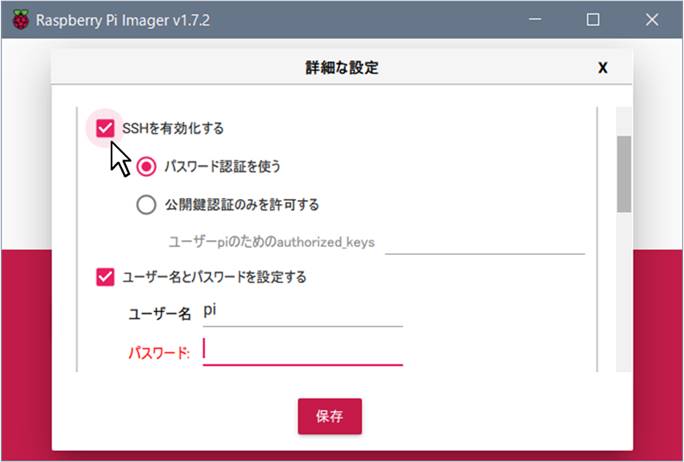
After setting, select the storage for installation and press the "Write" button to start the installation.
Here, we will create a simple screen focusing on the explanation of basic operations.
[Explanation video]
Before drawing, first set the resolution according to the touch monitor to be displayed.
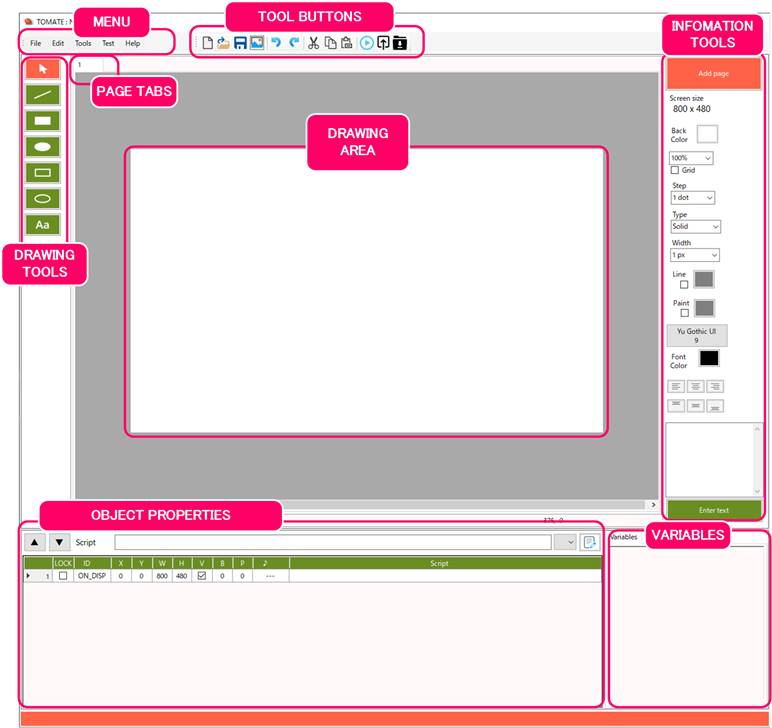
The current resolution is displayed in the "Information Tool" on the right side of the app screen.
Menu: Tools: Setup , and on the setting screen, set the value of "Screen size" of the touch panel to be displayed.
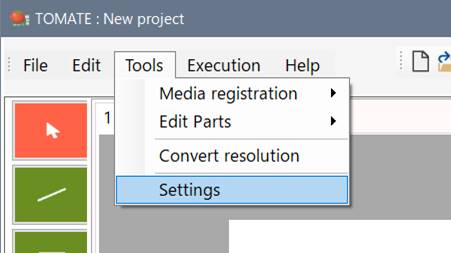
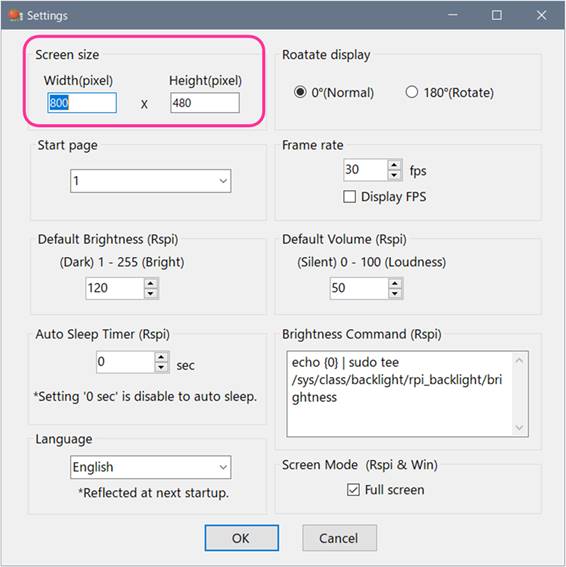
Other
settings include Rotate display, Start page, Frame rate, Default Brightness*,
Default Volume*, Auto Sleep Timer*,
Brightness command*, Screen mode, and Language (English and Japanese).
* Settings for Raspberry Pi
![]() The
settings are saved for each project. (Excluding
language settings)
The
settings are saved for each project. (Excluding
language settings)
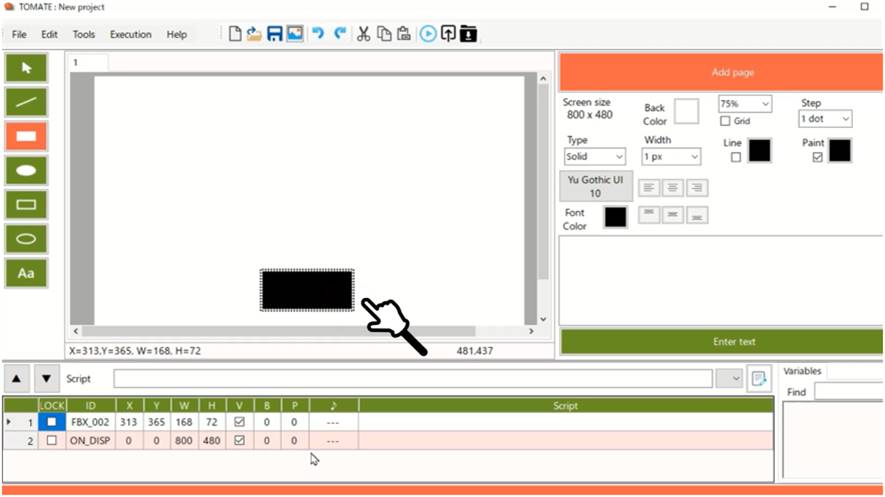
First, let us draw a shape on the screen.
On the left side of the app screen, click the drawing
tool shape to enter drawing mode.
Left-click and drag
the mouse at the appropriate location on the drawing area, and release the
click to draw the shape.
![]() You
can draw an image by dragging and dropping an image image such as BMP, JPG, or
PNG displayed in a file or web browser
You
can draw an image by dragging and dropping an image image such as BMP, JPG, or
PNG displayed in a file or web browser
to the drawing area.
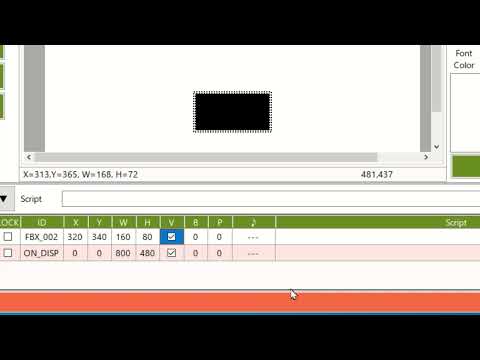
The shapes displayed on the screen are called the “object”.
![]() Press
the ESC key to return from blending mode to selection mode.
Press
the ESC key to return from blending mode to selection mode.
Each drawn object has properties attached to it. Information is added to the "Properties area" at the bottom of the app.
Properties include Object ID, X Coordinate, Y Coordinate, W Width, H Height, V Display, B Blinking, P You can specify the behavior of touch operation (long press / continuous), ♪ touch sound, and script.

![]() The
ID=ON_DISP
object is an object for writing scripts to run when the page is displayed.
The
ID=ON_DISP
object is an object for writing scripts to run when the page is displayed.
There is one per page and cannot be deleted.
If you select an object and uncheck the V column, the display of the object disappears.
Also, if you specify a time in units of 1ms in the B field of the object, the object will flash and display.
If
you specify a positive time
in the P field, you can specify the time to press and hold the object
before it responds when you touch it.
If you specify a negative time, the object reacts continuously at the
specified interval when touched.
![]() Although
it depends on the operating environment, it is recommended to specify the time
in 1ms increments of 100ms or more.
Although
it depends on the operating environment, it is recommended to specify the time
in 1ms increments of 100ms or more.
Even if you specify a short time, it may not follow
depending on the process.
‘♪’ The touch sound is a combo box, and when you click it,
you can select the registered sound source in "Menu: Media
Registration".
When you specify a sound for an object, it will play the specified sound each time
you touch it.
TOMATE registers four types of sound sources by default.
![]() If
you specify the sound source in the ‘♪’
field at the “ON_DISP”, you will hear one sound when the page is
displayed.
If
you specify the sound source in the ‘♪’
field at the “ON_DISP”, you will hear one sound when the page is
displayed.
By entering a script in the "Script" field of
the property, you can add the behavior when the object is touched.
In this case, write “<@next>”.
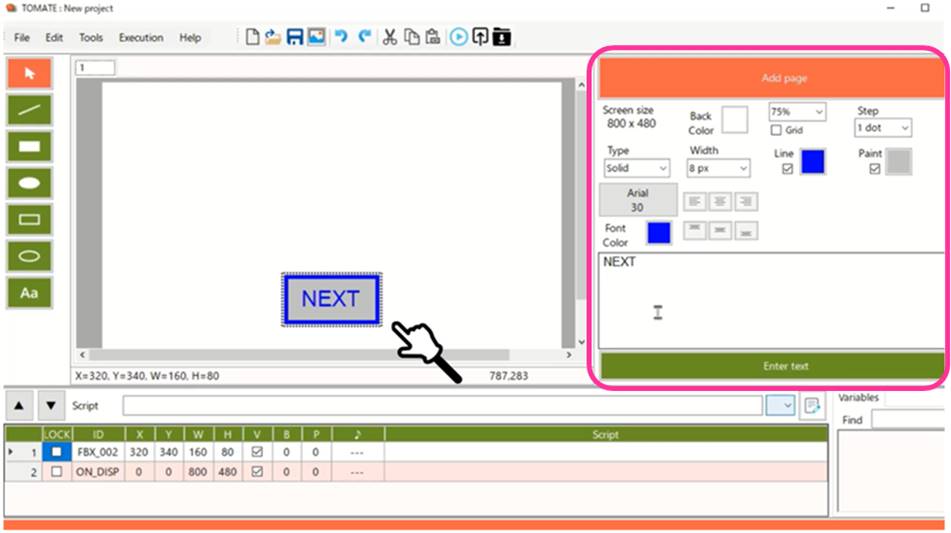
The "Info Tool" allows you to add pages, specify the page background color, enter text for selected objects, specify the fill color, line type, line width, line color, text color, and text position of the figure.
![]() All
objects except “ON_DISP” can display text.
All
objects except “ON_DISP” can display text.
With the object selected, enter a character in the text box field of the Info
tool, and press the "Enter text" button to display the text in the
center of the selected object.
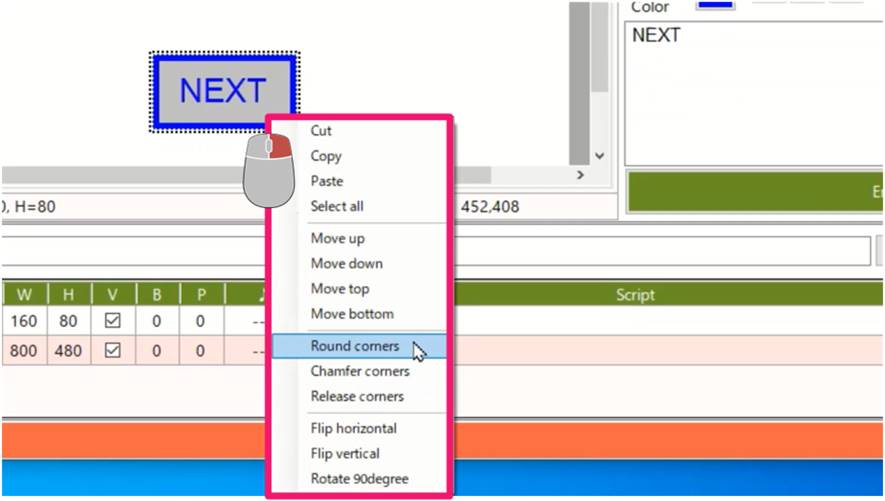
In the drawing area, right-click an object to display a menu where you can process the shape, such as rounding and chamfering the corners, and rotating and flipping the image.
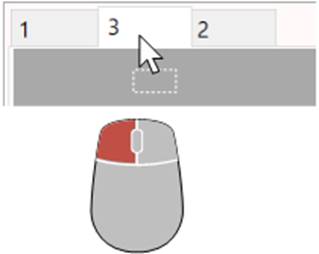
![]() Press the Info tool button to add a page.
Press the Info tool button to add a page.
In
TOMATE, the screen for each page are managed in Tabs.
Click the tab to switch between drawing pages.
You can drag the tabs to change the order of the pages.
![]() The
order of the tabs is the order of the pages.
The
order of the tabs is the order of the pages.
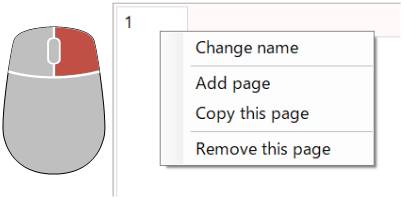
Right-click a tab to display a menu where you can rename, duplicate, or delete the page.
Now, as on the first page, create a button and write <@prev> in the button's script.
![]() The
script
<page> command is used to page through
the pages.
The
script
<page> command is used to page through
the pages.
The <@next>
switches to the next page when touched. <@prev> switches to the previous page.
Enter <page name> to
switch to the specified page.
When you're done, click "Menu: Run: Test" or press F5.
A test window opens, switching pages each time you click the button.
This section focuses on scripts.
[Explanation video]
The TOMATE script provides the following unique commands:
|
substance |
|
|
[ ] |
Viewing Variables |
|
< > |
Page navigation |
|
( ) |
Variable arithmetic |
|
xxx{ } |
command |
|
“ “ |
Output to ‘Output.txt’ file |
It also uses the following symbols as delimiters:
|
Delimiter |
substance |
|
: |
Command separators In a command Separator items |
|
, |
In the command Delimiter of setting values |
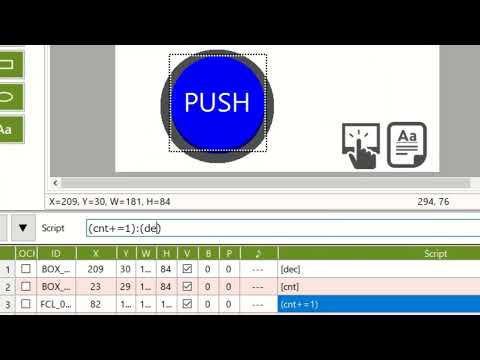
Each command can be separated by a ‘:’ (colon), allowing multiple commands to be used on a single object.
Example)
|
(cnt+=1) :
<@next> : "Next page" |
When touching
the object, the variables “cnt” is +1, and moves to the next page,
and message "Next page" write to a file of “output .txt”
The characters handled in the TOMATE script basically do not need to distinguish between strings and numbers.
![]() When
a number is treated as a string, or when using
parentheses, commas, and colons used in the TOMATE script in the string,
When
a number is treated as a string, or when using
parentheses, commas, and colons used in the TOMATE script in the string,
it is recognized as a collective string by enclosing it in single quotation
marks ' '.
Some TOMATE scripts perform two types of behavior.
1. What is reflected in the always-on display ( ![]() icon is described in the script reference)
icon is described in the script reference)
2. Execute when
touch operation or written to the file ‘INPUT.TXT’
(![]()
![]() icon describes)
icon describes)
Let's create one.
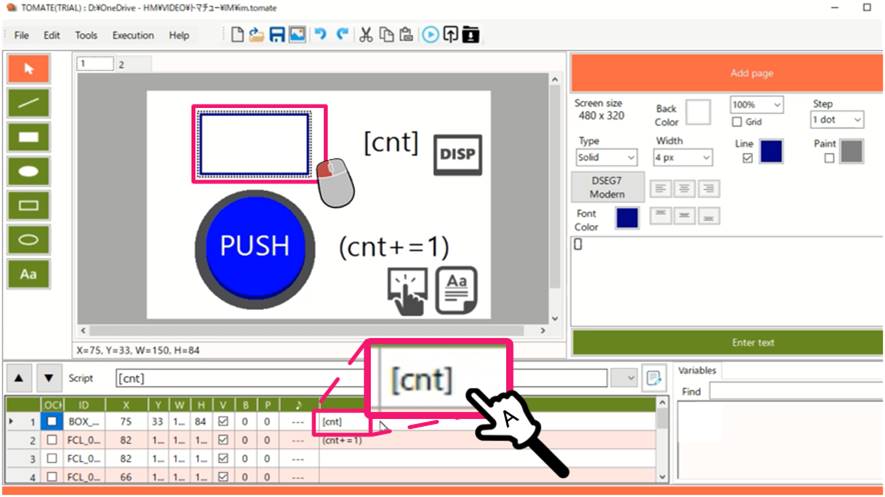
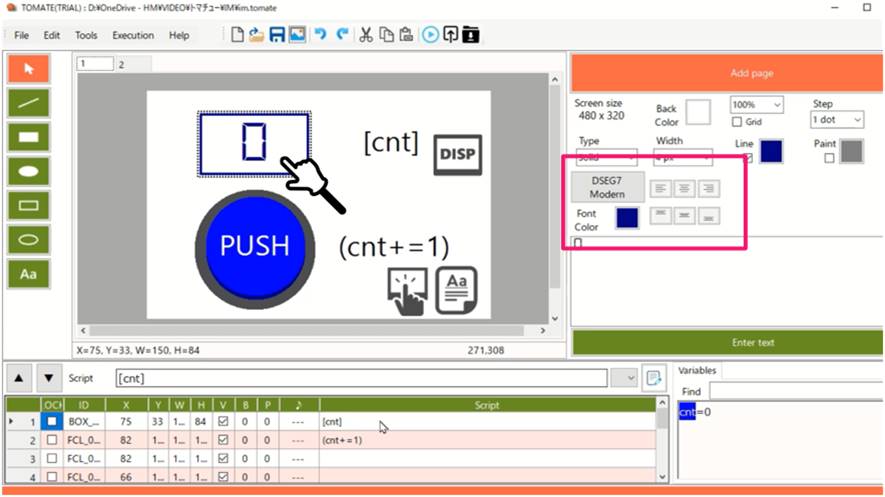
Draw a
suitable object and write [cnt] in the script field of that object.
This ensures that the value set for the variable ‘cnt’ is
displayed in that object.
![]() The
script [var] is
an important command.
The
script [var] is
an important command.
This will always display the contents of the variable in the object.
Some commands follow the contents of [var] and display
it as a separate string.
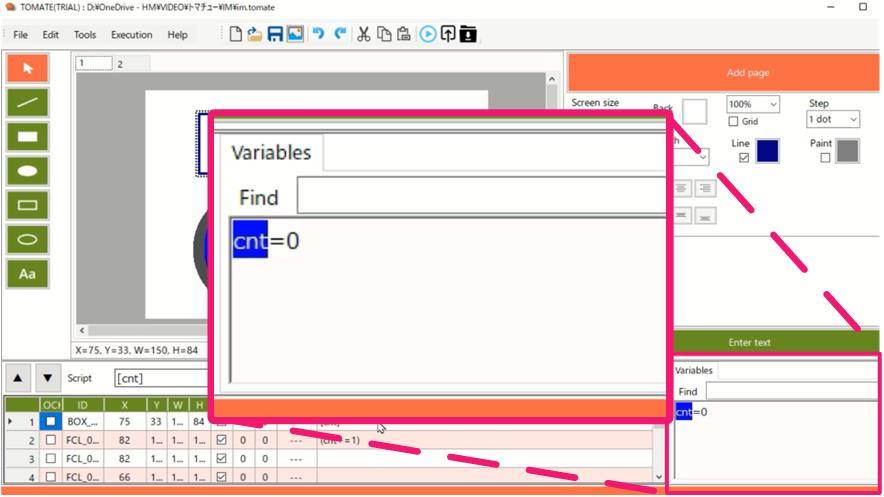
After using a variable in a script, write the variable name in the Variables area.
In the Variables field, you can enter the initial value of the variable with '='. In this case, you enter the ‘cnt=0’ in Variables field.
IN
TOMATE, IF THE VARIABLE VALUE IS ONLY A NUMBER, IT IS TREATED AS A NUMBER, AND
IF IT CONTAINS A STRING, IT IS TREATED AS A STRING.
![]() To set a variable, you can write the variable name as equal, such as ‘a=b=c=0’.
To set a variable, you can write the variable name as equal, such as ‘a=b=c=0’.
It is initialized to the value written at the end.
When you enter an initial value for a variable value, the string in the drawn object changes to that variable value.
At this time, the character format displayed on the object is the format set in the "Info Tool".
Now let's script the touch movements.
Draw an object that will be a button, and then click
|
(cnt+=1) : var{ cnt : 1 } |
.
![]() A
script
(expression) is a command that performs a calculation on a variable.
A
script
(expression) is a command that performs a calculation on a variable.
TOMATE uses only "assignment operators"
such as "+=" and "-=".
The left-hand side is always a variable and does not need to be enclosed in [
].
However, if you want to use a variable on the right side, you must enclose it
in [ ].
In addition, it can be specified as (formula: lower limit, upper limit).
If you enter the script (cnt+=1) as:
(cnt+=1:0,10): The ‘cnt’ value is loop in the range of 0 to 10.
(cnt+=1:10): The ‘cnt’ stops at the value of 10.
![]() The
script ‘var{ }’ is a command that prints variable values to
the Output.txt.
The
script ‘var{ }’ is a command that prints variable values to
the Output.txt.
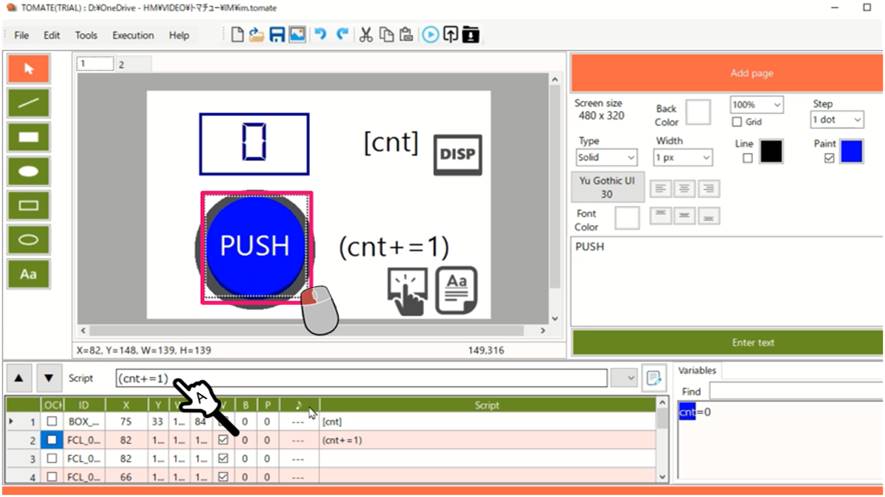
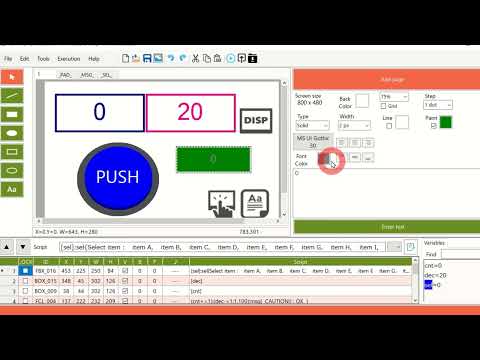
Now, every time you touch (click) this object, it will be CNT+1 and the display value of the display object will change as CNT changes.
When
you are finished, press the Tools button ![]() or go to Menu: Run: Test (F5).
or go to Menu: Run: Test (F5).
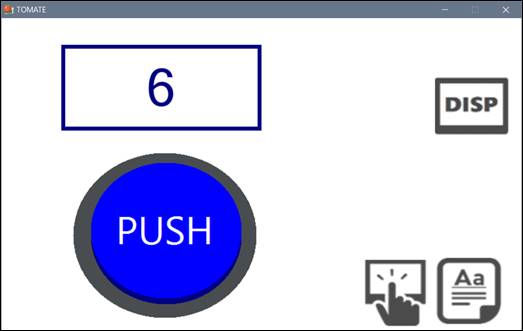
The
test window appears, and each time you press the PUSH button on the screen, the
display increases by 1.
In addition, the value of the variable ‘cnt’ is displayed in the Output .txt
column of the I/O window.
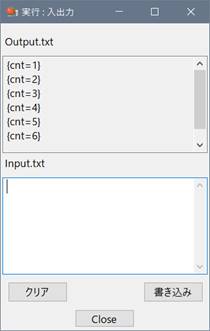
In the ‘input/output’ window, you can check the contents of the ‘Output .txt’ and write commands to the ‘Input .txt’ to check the operation.
![]() In
TOMATE, you can interact with external programs in two files, ‘Input.txt’ / ‘Output.txt’ as external interfaces.
In
TOMATE, you can interact with external programs in two files, ‘Input.txt’ / ‘Output.txt’ as external interfaces.
These two files are automatically created on the
current folder in TOMATE execution.
|
‘Input.txt’ |
Interface for inputting commands into TOMATE from the outside |
|
‘Output.txt’ |
Interface for outputting information from TOMATE to the outside world |
By reading
the contents of the ‘Output .txt’ from an external program, you can read the
operation contents and variable contents on TOMATE.
You can also send instructions to TOMATE by writing commands to the ‘Input.txt’
from an external program.
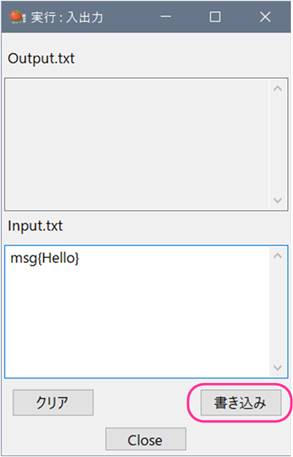
Write a script to the ‘Input .txt’ in the I/O window and press the [Write] button to execute the command immediately.
However,
only commands with ![]() icons in the script reference can write
to the ‘Input .txt’.
icons in the script reference can write
to the ‘Input .txt’.
For example, enter ‘msg{Hello}’ in the ‘Input.txt’
field and press the [Write] button.
A message box opens on the test window that ‘Hello’.
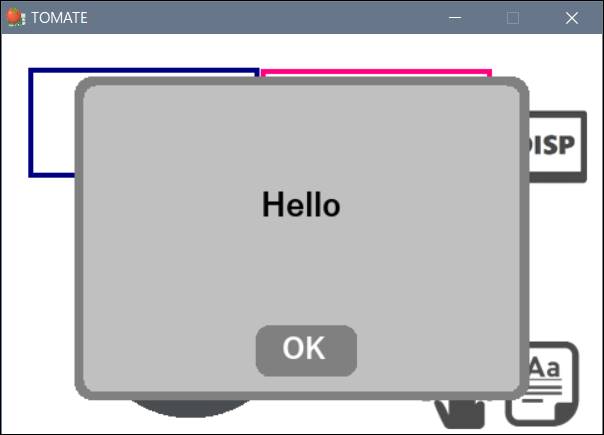
![]() The ‘msg{}’
command is a command that allows you to easily display messages.
The ‘msg{}’
command is a command that allows you to easily display messages.
You can arbitrarily set the number of buttons and the characters to be displayed
on the buttons.
If you do not specify anything, only the OK button is
displayed.
The message box is cleared when the button is pressed.
This section describes each part of the keypad, message box, and selector.
[Explanation video]
The TOMATE script provides three different parts for the user interface.
|
Part
Name |
script |
Page
name |
Contents |
|
Keypad |
pad{ } |
_PAD_ |
Numeric keypad interface upper limit value and number of input digits for inputting numerical values can be specified. |
|
Message Box |
msg{ } |
_MSG_ |
Interface to display a message or ask for
confirmation |
|
Selector |
sel{ } |
_SEL_ |
The interface variable for selecting items from multiple choices is assigned a "value" corresponding to the selected item name, but the display is displayed as "item name". |
The keypad is an interface for numeric input.

|
[V] : pad{ Title : Min, Max, Digit : Command } pad{ [V] : Title : Min, Max, Digit : Command } |
For the value of the variable [V], you can change the numerical value by keypad input.
![]() [V]
Outside the command, displays a number in the object.
[V]
Outside the command, displays a number in the object.
If you put it in the command, it will not be displayed,
only the settings can be made.
If
you specify a value of Min,Max, the input is
restricted within that range.
Those that exceed the range are set to the minimum and maximum values.
Setting the value of Digit limits the number of input digits. This number of digits includes the sign and decimal point.
Command can set the command to be executed when [ENT] is pressed.
Press outside the keypad exterior to cancel the input.
A message box is an interface for displaying messages and making inquiries.
|
msg{ Message : Button1=Command1, Button2=Command2, Button3=Command3 } |
Displays
the string Message in the box.
For Buttons 1, 2, and 3, specify the string to be displayed
on the button, connect them with '=', and specify the command when Commands 1,
2, and 3 are pressed.
The display of the button layout changes depending on the number of buttons
specified.
Button is optional. Simply type msg{Message} and the
"OK" button will be added automatically.
Pressing Button clears the message and, if specified, executes the command.
A selector is an interface that selects one of several items.

|
[V] : sel{ Title : 0=item0, 1=item1, ... , #=item# } sel{ [V] : Title : 0=item0, 1=item1, ... , #=item# } |
![]() [V]
causes the object to display the variable value, but the following ‘sel{ }’ command displays the "item name" corresponding to the
variable value.
[V]
causes the object to display the variable value, but the following ‘sel{ }’ command displays the "item name" corresponding to the
variable value.
Write by connecting the value corresponding to the variable value and the item name with '='. The value can be omitted, and if omitted, the number is automatically assigned as 0, 1, 2, etc. The value corresponding to the variable can be a number or a string.
When the number of items exceeds the number of items that can be displayed on one screen, the page switch button is automatically displayed.
If you press outside the selector appearance, the input will be canceled.
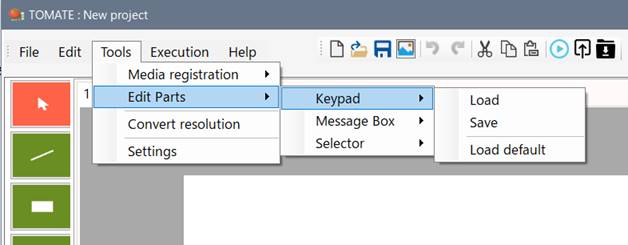
Each part can be customized.
Select Menu: Tools: Edit Part: Part Name: Load to add a page of the part to the drawing area.
Do not change
the page name of the part.
On each part page, you can change the color and font.
You can add text to the keypad and increase the number of selectors displayed per page.
Scripts for objects on the part page are special commands and cannot be written in normal TOMATE scripts.
Custom parts can be saved and executed as project pages as they are.
You can also open the Part page and choose Menu: Tools: Part Edit: Part Name: Save to save your custom part as the default and use it in other projects.
![]() If
the project does not have a parts page, the saved part is
called as the default.
If
the project does not have a parts page, the saved part is
called as the default.
Here, we will create a project that performs START/STOP with a single button operation and randomly changes the roll of the dice.
[Explanation video (first part)]
[Explanation video (second part)]
![]() TOMATE
has a function to group objects drawn in the drawing area and save them as figure data.
TOMATE
has a function to group objects drawn in the drawing area and save them as figure data.
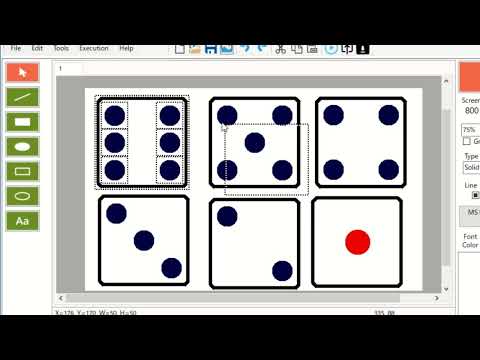
1. On a new page, use squares and circles to create 1~6 dice rolls.
2. Select the
created "1" dice all together and select File: Save Part as Image.
Similarly, save 2~6 dice as images.
3. Select Menu:
Tools: Media Registration: Image. The Image List dialog opens.
Register the image file of the 6 dice created in step
2.
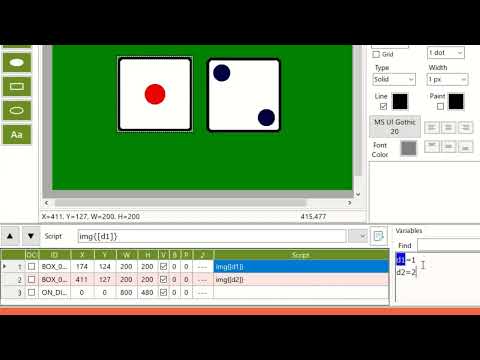
4. On a new
page, draw two square shapes and enter ‘img{[d1]}’ in one script field and ‘img{[d2]}’
in the other.
In the Variable field, enter d1=d2=1, Then the two dices are
drawn on two square objects.
5. Draw the START/STOP button, enter the following command in the script field, and “btn=0” in the variable field.
|
dsp{ [btn] :
0=START, white, blue : 1=STOP, white, red } : if{ (btn==0) : int{10
: cmd{ rnd{[d1]:1,6} : rnd{[d2]:1,6} : (btn=1) } } : cmd{ int{0:
} : (btn=0) : var{d1, d2} } } |
[Script explanation]
・
The ‘img{ }’ command displays an image image on an object.
If you specify a number (1-6), the image registered shape is displayed. You can also specify [Variable].
The displayed image is displayed according to the
object size while maintaining the aspect ratio of the original drawing.
Note that the registration number is from ‘1’. If you specify a number
that is not registered, nothing is displayed.
・ ‘dsp{ }’
is a command that displays an object with a specified string and color scheme,
depending on the value of [variable].
When btn=0, "START" is displayed in white letters on a blue
background, and when btn=1, "STOP" is displayed in white letters on a
red background.
・ ‘if{ }’
determines the Boolean value of the expression and executes the command
assigned to the falsehood.
“if{ (comparison expression): command to run when the comparison
expression is true: command to run
when false }”
It is separated by colons, so only one true/false command can be executed.
・ ‘cmd{ }’
can combine multiple commands into one.
Commands in an ‘if{}’ statement can contain only one command for each true or
false, or the ‘int{}’ command is similar.
For this reason, ‘cmd{ }’ combines multiple commands into a single command.
・ ‘int{ }’
executes the specified command at regular intervals.
The specified time is x1ms, and if
0 is specified, it stops.
The sample specifies 10ms, but increasing this value slows down the dice roll.
・ rnd{ } is a command that generates a specified
range of random numbers and sets them to [variable].
・ var{ } is a command that prints
the value of the specified variable to file ‘output.txt’.
It is enclosed in { } and the contents of the variable are printed separated by
commas.
e.g. If the dice is 1,2, var{ d1, d2 } → output.txt
to {1,2}
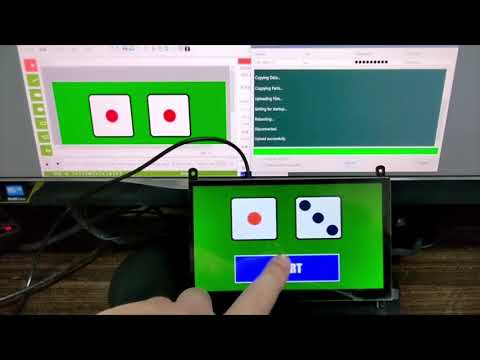
When you run the created
project, you will see two 1st dice and one button
labeled "START", and when you press the START button, it will switch to the STOP display and the dice will start
spinning at high speed.
When you press the STOP button, the two dice will stop at random eyes.
The dice have stopped,
their numbers will write to file ‘output.txt’ like ‘{1,2}’.
![]() By
reading the ‘output.txt’ string in the user program,
By
reading the ‘output.txt’ string in the user program,
processing can be performed as an interface with the
screen created by TOMATE.
For now, let us upload to a ‘Raspberry Pi’ device.
To upload, you need a Raspberry Pi device with a touch panel connected on the LAN.
Once
you have created a project and verified the test operation, click the Tools
button ![]() or
navigate “Menu: Run: Upload” (F6) to open the Tomate-SSH window.
or
navigate “Menu: Run: Upload” (F6) to open the Tomate-SSH window.
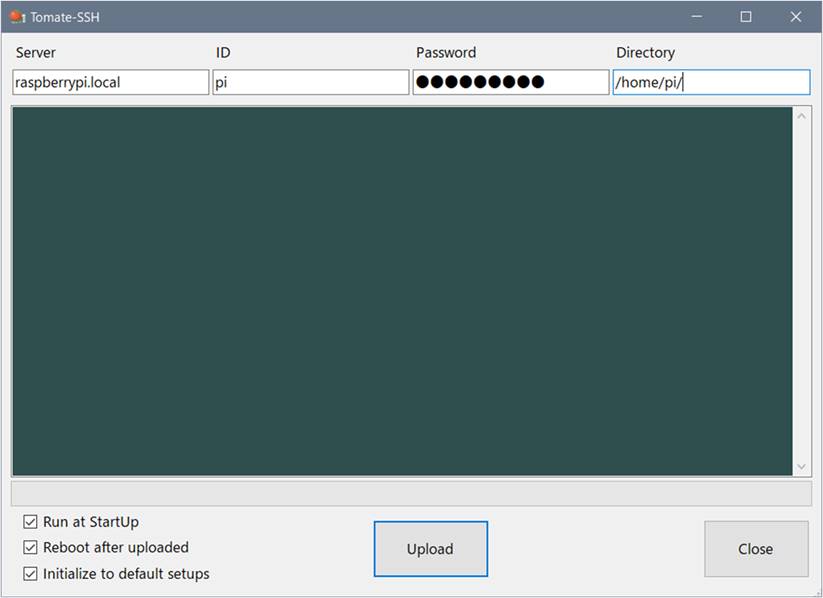
In each text box, include the login information for the Raspberry Pi you want to connect to.
|
Server |
Hostname configured (default: raspberrypi.local) (or Raspberry Pi IPv4 address) |
|
ID |
Username set (default: pi) |
|
Password |
Password you set (default: raspberry) |
|
Directory |
/home/username/ (default:/home/pi/) |
Check
“☑ Run at Startup”, “☑
Reboot after uploaded”, “☑ Initialize to default setups”.
Now, after the upload is finished, the Raspberry Pi
will restart and TOMATE will start automatically.
If
the upload is successful, the screen created by TOMATE will be
displayed on the touch monitor of the Raspberry Pi after rebooting and
executed.
![]() If
the upload fails, please check the username and password you set.
If
the upload fails, please check the username and password you set.
Also, if you specify the host name (raspberrypi.local)
for the Server, the upload may fail in rare cases.
In such cases, specifying an IP address mitigates this failure.
If you want to find out the IP address of your Raspberry Pi, enter the
following command from the Windows command prompt:
|
ping -4 raspberrypi.local (or hostname you set) |
If the ping is successful, you should receive a message like the following:
|
Pinging raspberrypi.local [192.168.x.xx] 32 bytes of data: |
[192.168.x.xx] is the IP address of the Raspberry Pi. Enter
this address in the Server field.
![]() If
you want to cancel AutoStart, uncheck ‘◻ Run at
Startup and upload’.
If
you want to cancel AutoStart, uncheck ‘◻ Run at
Startup and upload’.
After rebooting, the AutoStart configuration is removed
from the Raspberry Pi.
TOMATE is designed to update only the parts that need to be updated so that they can handle low throughput.
However, processing may slow down as the number of parts increases and more items are displayed at once.
Also, even if you display a high-resolution screen in the background and the parts on it are updated, the process may be slow.
You need to create a screen to match the processing power of the device you want to run.
![]() TOMATE
has a function to display FPS for confirmation.
TOMATE
has a function to display FPS for confirmation.
In the setting dialog of "Menu: Tools: Settings", check "FPS
display" in the "Drawing speed" column to display FPS in red letters in
the upper right corner of the screen.
This will allow you to see how well your system is handling
it.
![]() To
increase processing power, try the following:
To
increase processing power, try the following:
・ Avoid changing more than one display at a time
・ Reduce the number of parts on a page
・ Do not display large images, such as backgrounds
・ Reduce screen resolution
This is a sample project using commands.
Command usage examples
|
File Name |
Main Commands |
substance |
|
bar{ } |
Example of using the progress bar command |
|
|
brt{}, slp{} |
Raspberry Pi brightness and sleep adjustment |
|
|
ckb{ } |
Example of using checkbox commands |
|
|
dsp{ } |
dsp{ } command usage example |
|
|
if{ } |
IF branch usage example |
|
|
int{ } |
Example of using interval commands |
|
|
pad{}, sel{}, msg{} |
Samples using parts |
|
|
pro{ } |
Property command usage example |
|
|
snd{ }, bgm{ }, vol{ } |
Examples of using sound-related commands |
|
|
tim{ } |
Example of using date/time display commands |
Demo Project
|
File
Name |
substance |
|
It is a roulette introduced in the “4. Advanced” edition in which the dice rotate randomly. Press the START button to start rotation, and press the STOP button to stop rotation. When STOP, the output .txt is diced. |
|
|
This is a graph display sample using the ‘bar{}’ command. Every time you touch the title, the value of d1~d7 is set randomly from 0 ~ 100 and the graph is drawn. |
|
|
Hamster Clock It is a digital clock using the illustration of "Irasutoya.com". 6:00~16:00 on the morning page 16:00~20:00 on the evening page From 20:00~6:00, the night page is automatically switched and displayed. When you touch the hamster, the manual 'M' appears, and you can manually switch between the screens by pressing the letters on the watch. Press the hamster again to return to automatic page switching. |
Precautions
・
All projects have a screen size of 800x480.
If you want to change the resolution, operate "Menu: Tools: Change
resolution" and change the resolution to the resolution of your
environment.
・
the "Segoe UI" font is used for
the text font.
If you use other font, you can change fonts in bulk by opening a project,
selecting all objects on the page with Ctrl-A, and then pressing the Font
button to specify the font.
© 2022 ![]()
Reproduction or
reprinting without https://clues.jp permission is prohibited.