Basic Operation
Here, we will try to create a simple screen, focusing on explanations of basic operations.
1. Preparation before drawing
First, set the resolution according to the touch monitor to be displayed.
The current resolution is displayed in the “Information Tools” on the right side of the app screen.
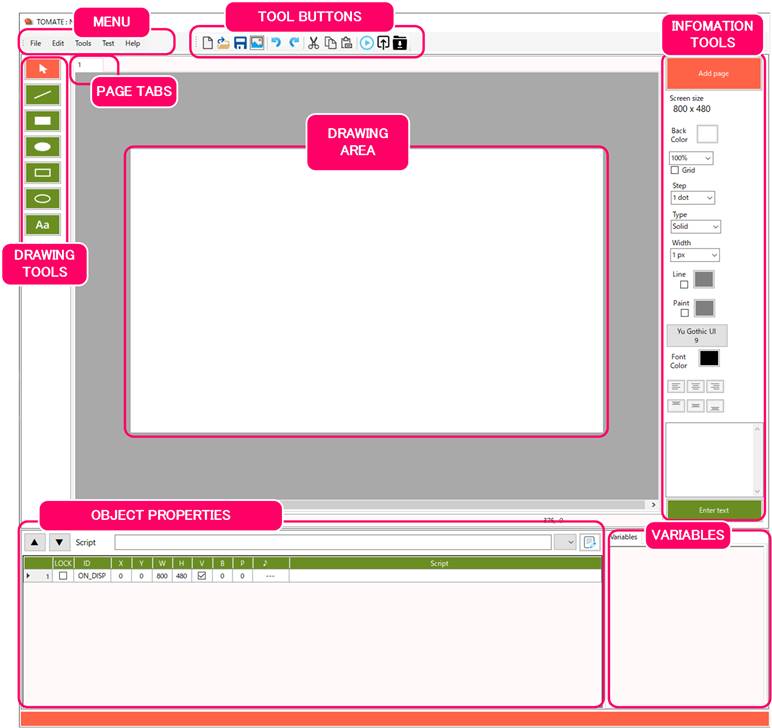
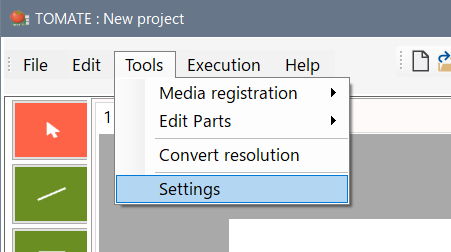
Select [Menu: Tools: Settings].
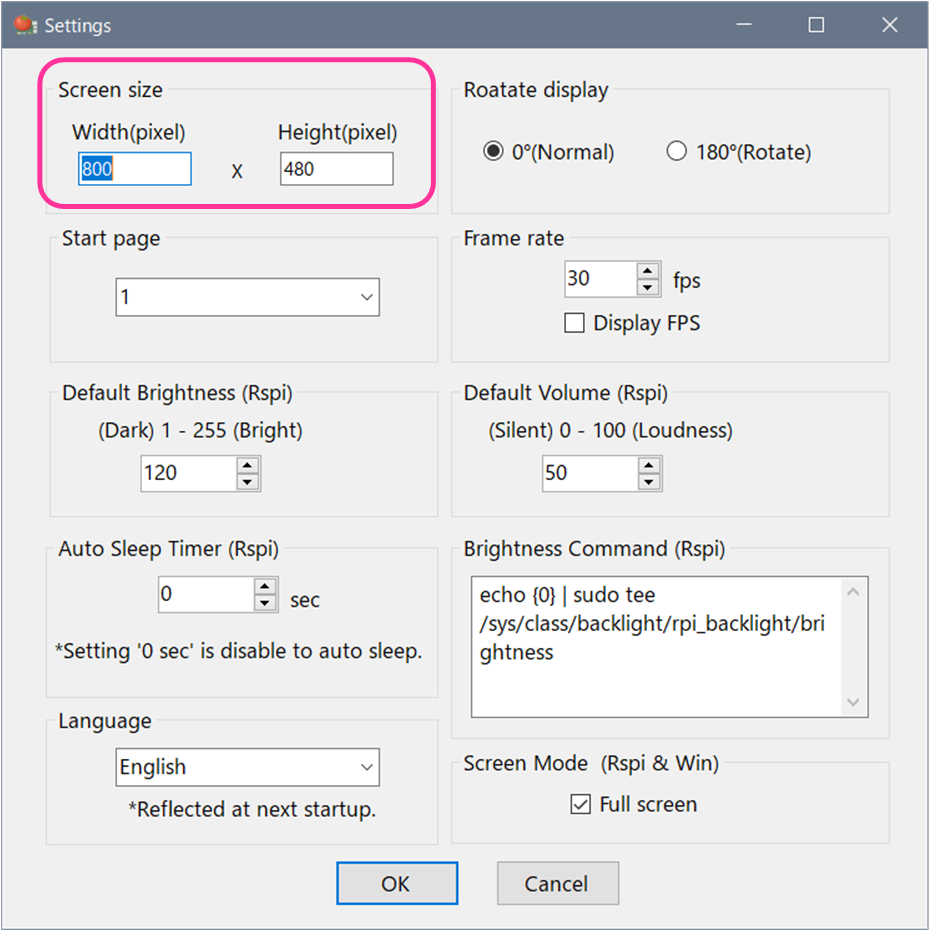
Set the resolution of the touch panel to be used in the “Screen size” field of the “Settings” dialog.
![]() Settings are saved individually for each project.
Settings are saved individually for each project.
2. Drawing of shapes
Let’s draw a figure on the screen.
On the left side of the app screen, click the “Figure button” of the “Drawing tool” to enter the drawing mode.

Left-click and drag the mouse at an appropriate position on the drawing area, and release the click to draw the figure.
![]() Press ESC key to return to selection mode.
Press ESC key to return to selection mode.
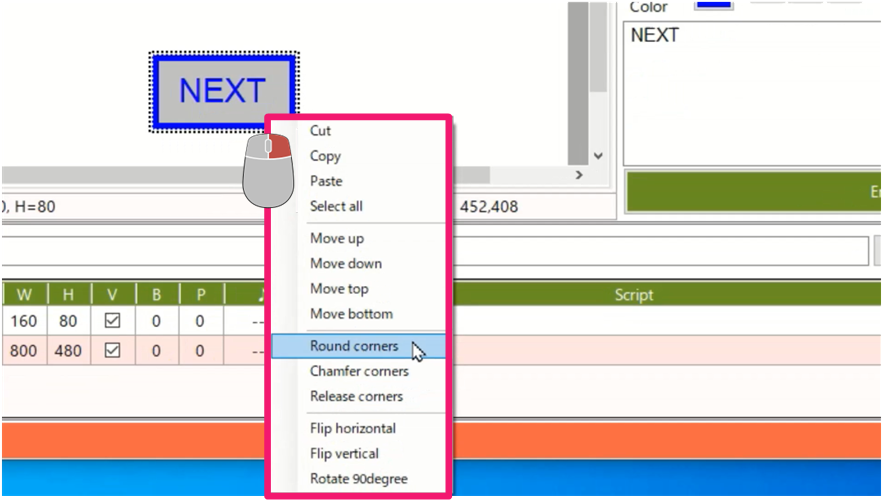
By right-clicking on an object, a menu will appear.
Shapes can be processed, such as rounding and chamfering the four corners, and rotating and flipping images.
Each drawn object has properties attached to it.
As shapes are drawn, information is added to the Properties Area.
Values can be written directly to each property column.

![]() ID=ON_DISP object
ID=ON_DISP object
Script to run when the page is displayed
This is an object to describe.
One is prepared for each page and cannot be deleted.
By entering a script in the “Script” field of the property, you can add actions when the object is touched.
In the example, <@next> is written in the script field of the drawn figure.
[About properties]
- [ID] Object ID
- [X] X coordinate
- [Y] Y coordinate
- [W] Width
- [H] Height
- [V] Display ON/OFF
- [B] Flashing time (x1ms) No flashing at 0
- [P] Behavior of touch operation
(positive number: long press/negative number: continuous press) - [♪] Registered touch sound
- [Script] Script
Uncheck the V column to hide the object.
If you specify a positive time (ms) in the P column, you can specify the long press time until the object responds when you touch it.
If you specify a positive time (ms) in the P column, you can specify the long press time until the object responds when you touch it.
If you specify a negative number of time (ms) in the P column, when you touch the object, it will react continuously at the specified interval.
![]() 100ms or more is recommended for time specification in 1ms units. May not follow even if you specify a short time.
100ms or more is recommended for time specification in 1ms units. May not follow even if you specify a short time.
[♪] The touch sound is a combo box, and when you click it, you can select the sound source registered in “Menu: Media registration”.
If you assign a sound to an object, the specified sound will be played each time you touch it.
TOMATE has 4 types of sound sources registered by default.
![]() If you specify a sound source in the ♪ field of ON_DISP, a sound will be played once when the page is displayed.
If you specify a sound source in the ♪ field of ON_DISP, a sound will be played once when the page is displayed.
3. Character input
The “Information Tool” on the right side of the app allow to:
- Add new page,
- Specify the page background color
- Enter text for the selected object
- Specify the fill color
- Line type, line width, line color
- Text color, and text position of the figure.
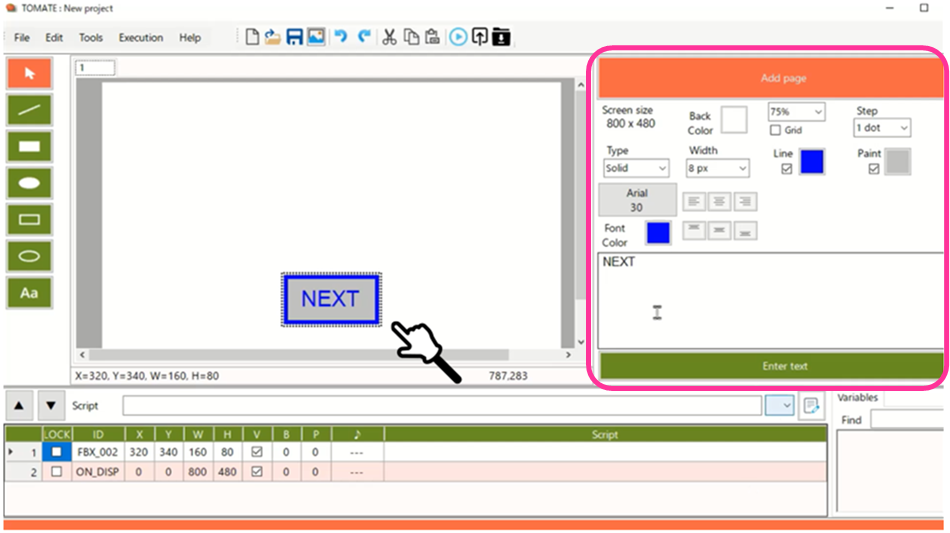
With the object selected, enter characters in the text box field of the information tool.
When you press the “Enter text” button, text is displayed in the center of the selected object.
![]() All objects except ON_DISP can display characters.
All objects except ON_DISP can display characters.
4.Page operation
![]() Press the Info tool button to add a page.
Press the Info tool button to add a page.
In TOMATE, the screen for each page are managed in Tabs.
Click the tab to switch between drawing pages.
[About page operation]
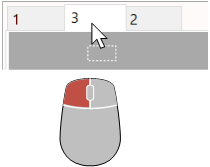
You can change the order of the pages by dragging the tabs.
![]() The order of the tabs will be the order of the pages.
The order of the tabs will be the order of the pages.
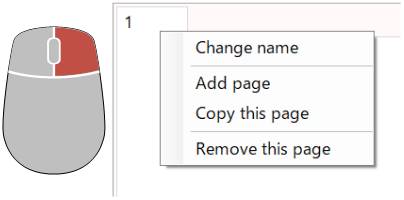
Right-clicking a tab displays a menu.
You can change, duplicate, or delete page names.
In the example, a button is created on the added page and <@prev> is entered in the script field.
![]() The script is a command used for page navigation.
The script is a command used for page navigation.
<@next> switches to the next page when touched.
<@prev> switches to the previous page.
Enter to switch to the specified page.
Make completed, you can run the test by pressing “Menu: Run: Test” or pressing the F5 key.
Test execution is covered in the next chapter.