Parts
Here, we will explain each part of the keypad, message box, and selector.
There are three types of parts for the user interface in the TOMATE script.
| Parts name | Scripts | Page name | Contents |
|---|---|---|---|
| Keypad | pad{ } | _PAD_ | Numeric keypad interface for entering numbers. Upper and lower limit values and number of input digits can be specified. |
| Message Box | msg{ } | _MSG_ | Interface for message display or inquiry for confirmation (up to 3 buttons) |
| Selector | sel{ } | _SEL_ | Interface for selecting items from multiple choices. The “value” corresponding to the selected item name is assigned to the variable, but the “item name” is displayed. |
1. Keypad
The ‘Keypad’ is an interface for entering numbers.
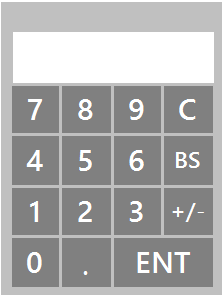
[V] : pad{ Title : Min, Max, Digit : Command }

pad{ [V] : Title : Min, Max, Digit : Command }
You can change the value of the variable [V] by keypad input.
![]() When [V] is put out of the command, the numerical value is displayed on the object. If you put it in a command, you can only set it without displaying it.
When [V] is put out of the command, the numerical value is displayed on the object. If you put it in a command, you can only set it without displaying it.
Specifying ‘Min’ and ‘Max’ values restricts the input within that range.
Those exceeding the range are set to the minimum and maximum values.
Setting the Digit value limits the number of digits to be entered. This number of digits is the number of digits including the sign and decimal point.
Command can set the command to be executed when [ENT] is pressed.
Pressing outside the keypad appearance cancels the input.
2. Message-box
The ‘Message-box’ is an interface for displaying messages and making inquiries.

msg{ Message : Button1=Command1, Button2=Command2, Button3=Command3 }Display the string of ‘Message’ in a box.
For ‘Button1,2,3’, specify the string to be displayed on the button, connect with ‘=’, and specify the command when pressed for ‘Command1,2,3’. The display of the button layout changes according to the specified number of Buttons.
Button can be omitted. By simply entering msg {Message}, the “OK” button will be automatically added.
Pressing the Button clears the Message-box and executes the command, if specified.
3. Selector
The ‘Selector’ is an interface that selects one item from multiple items.
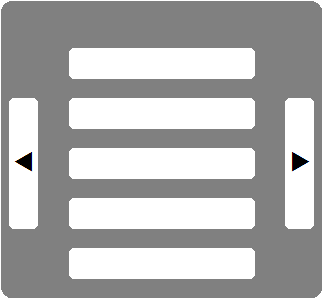
[V] : sel{ Title : val0=item0, val1=item1, ... , val#=item# : command }

sel{ [V] : Title : val0=item0, val1=item1, ... , val#=item# : command }
After [V] command writing ‘sel{ }’ command displays the ‘item’ name corresponding to the variable value.
Describe the value corresponding to the variable value and the item name by connecting them with ‘=’.
The ‘val’ can be omitted, and if omitted, numbers 0, 1, 2, etc. will be automatically assigned.
Values corresponding to variables can be strings as well as numbers.
When the number of items exceeds the number of items that can be displayed on one screen, the page switching button is automatically displayed.
If you press outside the selector appearance, the input will be canceled.
If command is specified, the command will be executed after selecting the item. It will not be executed if the selection is cancelled.
4. Custom the ‘Parts’
The ‘Parts’ can be customized.
Select “Menu: Tools: Edit Parts: Part Name: Load” to add the Parts page to the drawing area.
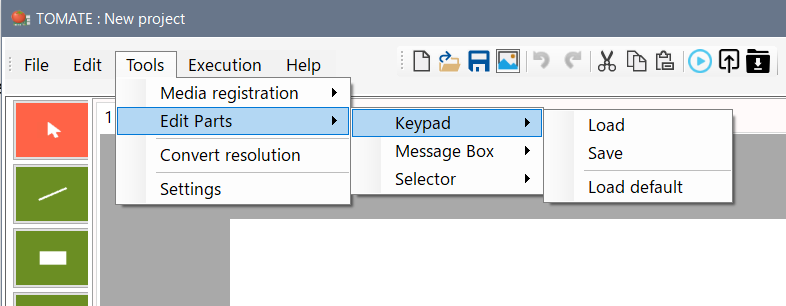
* Use the Parts page name without changing it.
You can change the color and font on each component page.
You can add characters to your keypad and display more selectors per page.
Scripts for parts page objects are special commands, and normal TOMATE scripts cannot be written.
![]() For details on parts custom scripts, refer to the “Operation Manual”.
For details on parts custom scripts, refer to the “Operation Manual”.
Customized parts can be saved and executed as they are as project pages.
Also, with the parts page open, selecting “Menu: Tools: Edit parts: Part name: Save” allows you to save the custom part as the default and use it in other projects.
![]() If there is no part page in the project, the part saved as default will be recalled.
If there is no part page in the project, the part saved as default will be recalled.